A new version of Visual Studio brings along with it a new version of the Windows Driver Kit (WDK). And so it is for Windows 10. As Visual Studio (VS) and Windows itself continue to evolve, so does the WDK. With at least one notable exception (that we dearly hope is fixed soon) the new versions of VS and the WDK are changes for the better.
Probably the biggest change is that WDK is now fully integrated. You can use it to build drivers for any desktop/server OS from Windows 7 onward. The WDK also includes built-in support for targeting 32-bit and 64-bit ARM processors, as well as Windows Mobile platforms. So, there’s a lot more in the kit than was there by default previously.
The Most Important Change
Let’s get one absolutely critical point out of the way immediately: They changed the menu bar titles back to upper and lower case by default. As far as I’m concerned, VS 2015 has me right there. But, in case you find yourself pining away for those menu items THAT SHOUT AT YOU, you can change back to all uppercase easily. Just go to Tools… Options… Environment… General… and UNcheck “Apply title case styling to menu bar” and you’ll be good to go.
OK? You happy? Now we can go on and deal with one or two other details.
Coexistence
You’ll be happy to know that VS 2015 and the Windows 10 WDK and VS 2013 and the Windows 8.1 Update WDK can live happily side by side on your dev system. After installing the new versions of VS and the WDK, here at OSR we were able to build drivers successfully using either tool set. In fact, if we were careful and got our settings right, we were even able to switch back and forth between tool sets for projects that were initially created in VS 2013. In other words, we were able to open a (KMDF) driver project created in VS 2013 with the Win 8.1 Update WDK in VS 2015 with the Windows 10 WDK and build the Solution without any problems. Our Configurations (Win 7 Debug, for example) showed up and could be selected just as you would in VS 2013. Even more interesting, after doing this we were able to open that same solution in VS 2013 and build it successfully using the Windows 8.1 Update WDK.
The key to making this work is paying attention to the “Platform Toolset” setting in the Configuration Properties (General section) of each project (shown in Figure 1).
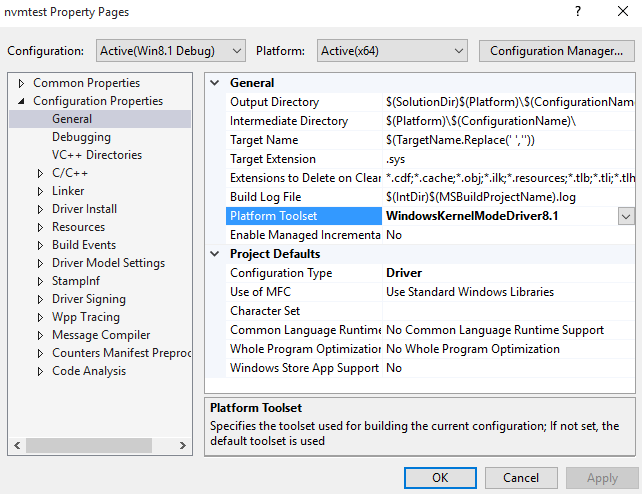
When you first open a Windows 8.1 WDK project with VS 2015, it asks you if you want to convert the projects to the new toolset. If you agree, the Platform Toolset will be changed to appropriate Win10 versions. In this case, when you build your driver you’ll be using the new project configurations, the new compiler and the new linker.
If you do not let VS convert the projects to VS 2015, it will use the toolset that was previously defined for each project when you build your code. That means even if you choose to do your editing in VS 2015, you can choose which toolset VS will use for compiling and linking.
In summary, the power is in your hands to choose the tools you want to use to build your driver. And the IDE that you use for editing does not necessarily dictate which tools you’ll use. Cool, right?
Where Are My Build Environments?!
The biggest change you’ll see when working with the Windows 10 WDK (and the appropriate default Windows 10 toolset) is that the only Solution Configurations defined by default are “Release” and “Debug”. No more “Win8.1 Debug”, “Win8.1 Release”, “Win8 Debug”, “Win8 Release”, “Win7 Debug”, “Win7 Release”. At first, we found this quite shocking. After all, we’ve been selecting the “build environment” to use for many years. To all of a sudden have these gone was, well, a bit unsettling. But after working with the new tools for a while, I totally get why they’ve made this change, and I’ve come to love it.
Why? Well, for one thing, most of us don’t really care about the myriad target OS versions. Maybe we care about one or two specific OS versions that we’re targeting, but do we really need to look at Release and Debug alternatives for every OS that’s supported? It makes for a mess, especially when shipping drivers to customers. You either have to tell them which build environments are supported (“Remember… you only want to build the Windows 7 or the Windows 8.1 versions of the driver), or you have to delete build environments from your project. Which is always a nerve-wracking thing to do.
Another reason I’ve come to like the “roll your own” settings approach is, given that you’ll almost certainly want to create your own Solution Configuration name(s) in any case, you now get to name them whatever you want. This is particularly nice for us, because we can name the configuration in a provided solution for a specific client, like we could create a “FredCorp Debug” Solution Configuration and a “FredCorp Release” Solution Configuration. Nice!
Finally, not having the long list of pre-made Solution Configurations just isn’t practical anymore starting in Win10. Not only are OS versions back to Win 7 still supported (so there are four different Target OS Versions: Win7, Win8, Win8.1, and “Win10 or higher”), but there are now multiple Target Platforms supported. These are: Universal, Desktop, and Mobile.
You define the Target OS Version and the Target Platform (Universal, Desktop, or Mobile) in the new “Driver Settings” section of your driver project’s Properties. See Figure 2.
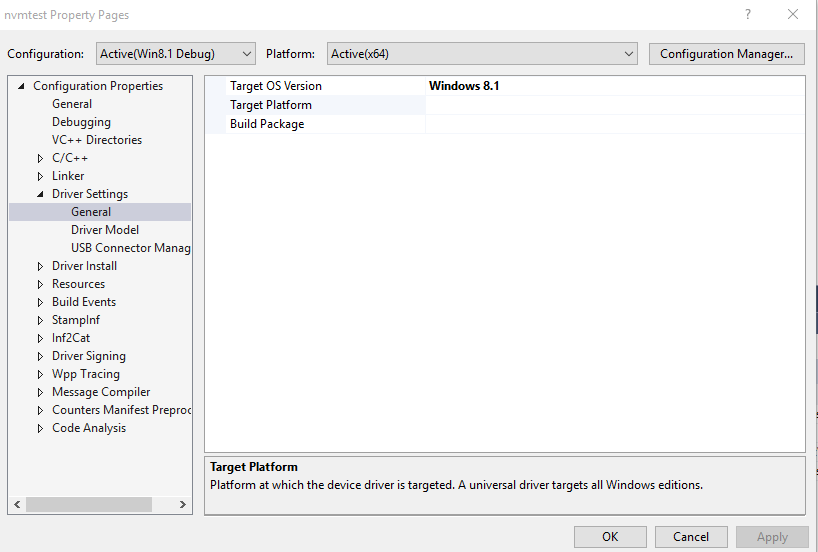
Ah! You might be wondering about what the “Universal” platform is all about. In short, it’s the setting that will allow your drivers to properly support any Windows platform – Desktop, Server, or Mobile. For a quick rundown on Universal Drivers, see the sidebar entitled, A Universal Driver? Do I Care?
[infopane color=”6″ icon=”0182.png”]A Universal Driver? Do I Care?
Starting with the Windows 10 WDK, the concept of Target Platform was introduced. Therefore, in addition to Target OS Version, and Solution Platform (the “Solution Platform” is Visual Studio’s way of indicating the target processor architecture), there’s now a Target Platform that indicates the environment to which you’re targeting your driver.
There are presently three possible Target Platforms:
1. Desktop
2. Mobile
3. Universal
The Desktop Target Platform is used to exclusively target “traditional” Windows client and server systems. The Mobile Target Platform indicates that your driver is exclusively targeting Windows 10 Mobile.
Without a doubt, the most interesting alternative is the Universal Target Platform. When you select Universal and successfully build your driver, your driver will be able to run on Windows systems running on Desktop (including Server), Mobile, and IoT Core platforms. Note that the Universal Target Platform can only be used if the Target OS Version for your Configuration is Windows 10 or later.
The concept of a Universal Target Platform is simple: You agree to only use a specific subset of APIs and/or DDIs in your driver, in return for the guarantee that your driver will successfully load on any Windows platform. How do you know which APIs/DDIs you can use in your driver? The documentation pages on MSDN have been (mostly) modified to indicate the Target Platform supported by that API/DDI. If the DDI says “Universal” you can use that function in a driver built for the Universal Target Platform.
How limited is the list of APIs/DDIs that you can call? For kernel mode drivers, not very restrictive at all. In fact, we’d be surprised if any KMDF driver is calling any DDIs (WDF or WDM) that aren’t supported on the Universal Target Platform. Certainly, all of the OSR-written kernel-mode drivers that we’ve tried here have all met the requirements. For user-mode drivers, things are a bit more limited. The more your user-mode driver does that is outside the realm of what a “traditional” driver supports, the more likely you are to be calling an API that’s not supported by the Universal Target Platform.
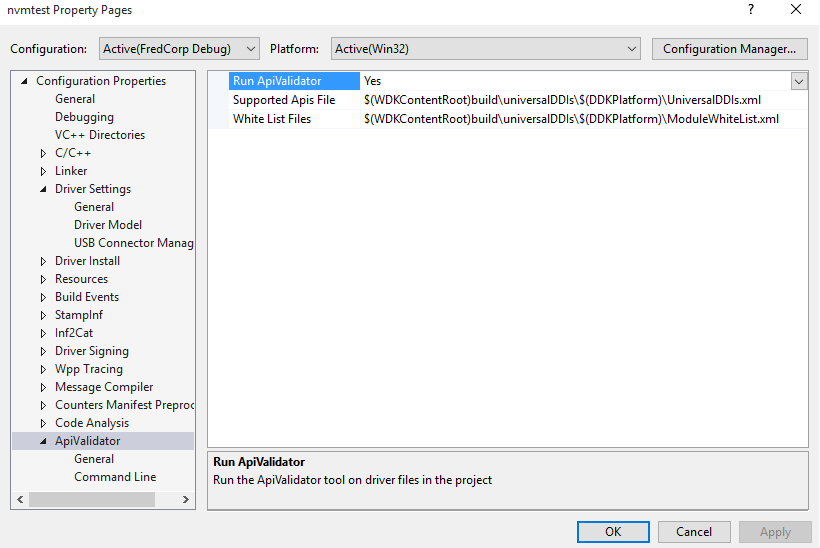
You can get a quick view of whether or not you’re using any prohibited APIs by selecting the Universal Target Platform, and then enabling ApiValidator:
Perhaps the best question about the Universal Target Platform is “Do you care?” If your driver is meant for a specific environment, whether that’s the traditional desktop environment or a Windows Phone, why should you care if it’s calling any DDIs or APIs that aren’t part of the Universal Target Platform? The answer to that is easy: Because it makes your driver more future-proof. We all know that most code, especially driver code, lives on long after its initial intended use. By building to the Universal Target Platform you can be sure that your driver is using the subset of DDIs/APIs that are most appropriate for general driver use, while also ensuring that your driver can run on another platform… perhaps Windows IoT Core… at some point in the future.
[/infopane]
So how do you create your own Solution Configurations? It’s easy, really. Within VS, open Configuration Manager. There are several ways to do this, but perhaps the easiest is to click on the “Configuration Manager…” button on the top right of the Project Properties dialog box… see Figure 2). Within Configuration Manager, pull down the “Active solution configurations” drop-down, and select “<New…>” as shown in Figure 3.
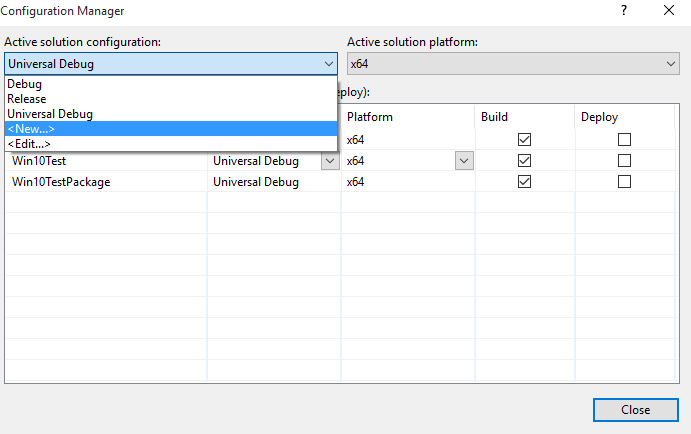
Choose a name for your new configuration, and choose to copy the settings from an existing Solution Configuration to make your life easier. You can see in Figure 3 I’ve already created a configuration for myself named “Universal Debug.”
Once the new Solution Configuration has been created, ensure it’s selected as the Active Solution Configuration and select the Project Settings you want to use in that Configuration. These settings can obviously include Target OS Version and Target Platform. But they can also include any other setting you may want to vary among your Solution Configurations. Like, for example, signing and StampInf processing. You could easily create a Solution Configuration named “Project Release” that builds the Release version of your components, selects Release Signing, and tells StampInf to stamp a specific version into your INF’s DriverVer.
The key point to keep in mind here is that as the WDK becomes more integrated with VS, we get to leverage increasing amounts of Visual Studio’s capabilities to make our driver development jobs easier.
Where’s My Code Analysis Window!?
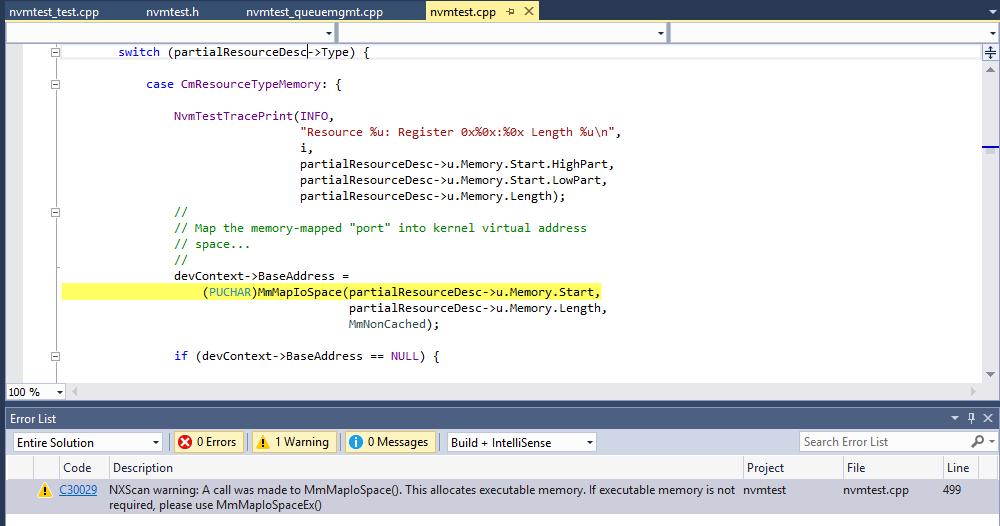
It’s dead, Jim. No, not code analysis. Certainly not Code Analysis! But the separate window that appears with code analysis warnings after your driver builds is gone. Code analysis warnings now appear along with all the other errors and warnings about your code, in the “Error List” window that’s traditionally located at the bottom of VS. You can see this in Figure 4. We’ll miss the dedicated Code Analysis Window. Sigh!
Anything Else?
Actually, there’s a lot. But we don’t have the space to get into much more right now. Static Driver Verifier works almost identically to the way it works in the Windows 8.1 Update WDK. Driver testing (including automated deployment) is rumored to actually work and be far more reliable than it has been in the past, but we haven’t had time to try this yet. And, no… “Calculate Code Metrics” still only works on Managed Code (why they can’t provide me the LOC, Cyclomatic Complexity, and other metrics for my driver is frankly beyond me… it would actually be helpful).
In Summary
There are a lot of changes in VS 2015 and a lot of cool things in the Windows 10 WDK. If you’ve been waiting to install VS 2015, to be sure it won’t break your existing development environment, our tests indicate that you won’t encounter any problems. Dive in, and let us hear what new features you find, and what old features you miss!
