I used to be a Visual Slick Edit fan. But now I’ve fully bought-in to using Visual Studio (VS) as an editor for driver development.
Whenever I tried to use VS for driver development in the past, I was always frustrated with strange behavior (“Why does it insist on indenting my case statements incorrectly!”), lame and close to useless syntax highlighting, and pointless information panes.
Over the years, Visual Studio and I have come to an understanding. A happy agreement, even. I found that there are two primary keys to becoming happy with VS. These are:
- Taking the time to customize the environment
- Selecting the right set of Visual Studio Extensions
Interestingly, these two things work together.
Customization
If you’re like me, you’ve got work to do. All the time. You just want to open a project and get busy writing your code. You don’t want to spend time fooling with your environment. You’ve got better things to do.
The thing is, with Visual Studio, time spent getting your environment customized to your needs and preferences will be time well spent. You’ll find the VS editor less annoying every time you use it. And, yes, I hesitate to say it, but you will be more productive. So, be good to yourself. Take a Friday afternoon and spend time on Visual Studio customization settings. I’ll even give you a few ideas on where you can start.
In case you haven’t noticed, there are at least 32 million different things you can set, change, or tune within Visual Studio. Just opening the dialog box from “Tools -> Options… “, presents you with around two dozen primary sets of options that you can play with. The exact number of options depends on what you’ve installed with VS. But in terms of customizing your driver coding environment, there are two or three primary option sections that you will definitely want to play with.
The first set of options are in the Environment section. Here, you can customize things ranging from the overall color scheme (you’ve probably already changed that) to how the “tabs” for each document that you have open in the editor look. I recommend you just take the time to walk through each of the various subsections and the options they contain some afternoon.
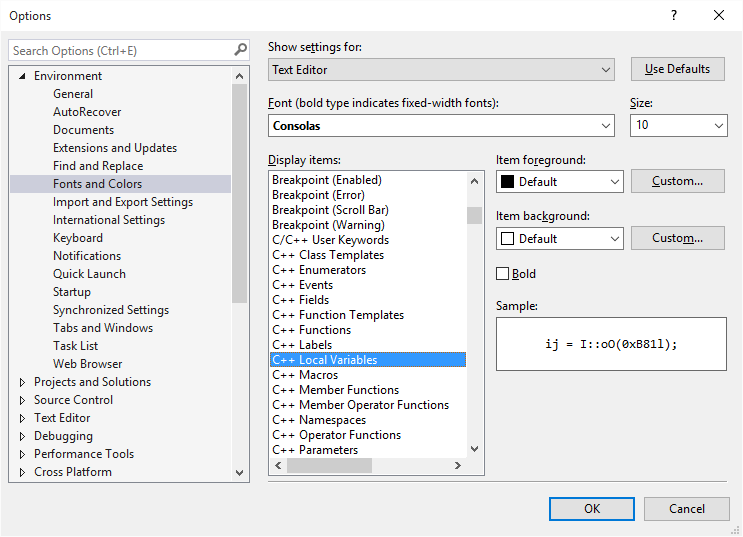
Unless you’re into boring, monochromatic, color-coding and green comments (I *hate* green comments) you’ll want to take some time and update the Fonts and Colors subsection (shown in Figure 1). Here you can change how VS syntax highlighting colors various things. For example, I like comments to be in gray. And I like my local variable names to be bold. Preferences for exactly how and what you highlight vary widely among developers, so there’s no single scheme that will work for everyone. Some people like a more muted palette of colors with most syntax elements being in similar colors (this is the VS default), and others like more aggressive color coding. It certainly true that you can easily go crazy here and wind-up with a mess, so make changes gradually. Note that changes do not take effect immediately, so you’ll have to click “OK” to close the Options dialog before you see your results.

Another small item that you’ll see in the Environment section is the Task List subsection. This section is often overlooked, I think. This section allows you to define a set of “tokens” that can appear in your comments. These comments, and the file and line on which they appear, will be picked-up by VS and listed in the VS “Task List” window (that you can show via View -> Task List). This allows you to leave notes to yourself about things that you want to return to in the code, and these notes are all gathered in one place within your solution. The default tokens are “TODO” and “HACK”… but you can of course add your own. I find this makes code cleanup easy when it’s time to think about shipping a project.
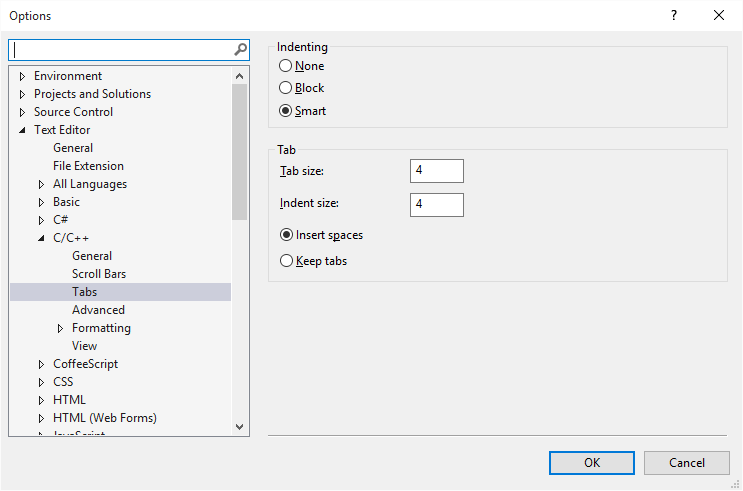
The next major section in the Options dialog that you’ll almost certainly want to customize is the Text Editor section (See Figure 2). Here’s where you can define, on a per-language basis, the formatting, indentation, and brace style that you prefer. Notably, this is where you set the option to use spaces instead of tabs in your code. You do use spaces instead of tabs, right? I mean, it’s the only way code should be written.

You’ll want to play around with various settings in this section. Take the time to work with them, until you’ve got what you like. If you’re like me, you’ll be amazed at how configurable VS is, how much less annoying you can make its default editing behaviors, and how much it will automatically do for you once you just take the time to tell it how you like things.
The third major section of the Options dialog that you might want to customize is the Source Control section. I’ve found that integrating VS into our source control system uber-convenient. Gone are the annoying prompts about read-only files. And you can see at a glance which files you’ve checked-out or modified. We use Perforce as our source control system, and the P4VS plug-in works just great.
Extensions
Even with all the customization that are available, Visual Studio can still be made better. A lot better, in fact. And one way that it can be improved is through the use of Extensions.
A wide range of VS Extensions are available on the web, and they range from the free and simple to the extensive and expensive. I’ll highlight three Extension packages that I’ve used and have come to love.
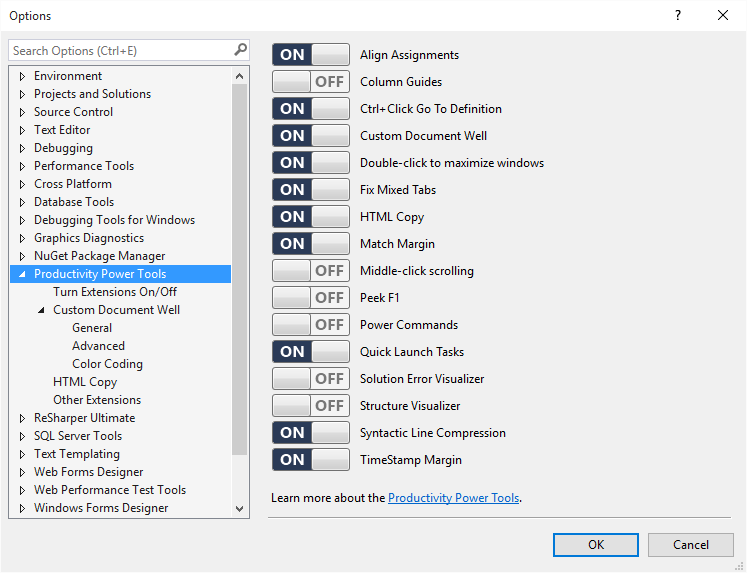
The first collection of Extensions, one that I really think is a must have, is Productivity Power Tools (See Figure 3). It’s free, it’s provided by Microsoft, and it works great. You can individually enable or disable the various features it provides. This allows you to eliminate those features you find horrible (I’m thinking the Structure Visualizer here), and only use those that you find helpful.

What features does Productivity Power Tools provide that are really cool? One subtle, but very helpful feature is “Syntactic Line Compression.” What this does is reduce the height of lines that don’t contain any text by 25%. This helps fit more useful code onto your screen, while still preserving your white space. Another feature I love is having more control over the “tabs” that represent each open document. Productivity Power Tools allows you to customize this little aspect of your VS use in many helpful ways, including the ability to color-code the tabs for files that belong to different projects within one solution.
Another thing that Productivity Power Tools will do is automatically detect mixed spaces and tabs in a source code file, and offer to convert it to consistently use one or the other with just one click. How cool is that?
Those are just a few small items. I strongly urge you to download the latest version of Productivity Power Tools and play with it. It’s free, and if you hate it you can uninstall it. What have you got to lose?
Moving beyond free tools, there are two major paid Extensions that you may want to consider. The first is ReSharper C++ (by JetBrains, details here). I became acquainted with ReSharper during a period of time when I was writing lots of C# code. It is no exaggeration for me to say that I love this Extension so much that if I had to write C# code on a daily basis I’d be willing to pay for the damn thing out of my own pocket. ReSharper elevated the quality of my C# code from “beginner” to “cool” with very little effort on my part.
ReSharper C++ is a relatively new addition to the ReSharper family, and as such is still suffering some growing pains. For example, in the most recent release (which added some clever handling of asserts) it does not properly understand WDK style ASSERT statements. But, whatever.
It’s difficult to describe all the things that ReSharper can do, but I’ll try to hit some of the things I personally like best. For one thing, it supports an intelligent version of “rename” that actually works. This lets you rename variables (local or global), structure fields, class members, and functions. I’m insane about names, I obsess over what variables should be called, so for me this is a really helpful feature.
ReSharper’s strength has always been its ability to analyze your code. In C#, it’s uncanny the way it suggests parameters. In C++, ReSharper also has a few clever tricks. It improves on VS Intellisense, both in suggesting function names and also in terms of suggesting variables to be passed as arguments. It will also do handy little things like substitute “->” for “.” automatically if you unintentionally type the wrong one. Or, if you select the “if” in an “if” statement, you can ask ReSharper to invert the sense of the “if” (automatically converting the text, adding an “else” clause if one was not there already, and putting the code that was in the “if” clause into the “else” clause).
And, of course, ReSharper C++ adds a “smarter” type of syntax highlighting and color coding.
Just like VS itself, ReSharper C++ has its own set of options that allow you to tune, customize, and configure it to your liking. ReSharper C++ also lets you define default naming styles. So, for example, you can tell it that you use Camel Case for variable names, and start those names with upper case if they’re formal parameters to the function and lower case if they’re local variables. And, if you don’t follow these rules in the code you write, ReSharper will gently remind you.
Another nice feature that ReSharper has is that it’ll show you (in the VS scroll bar) the location of any issues it detects in your code.
The age-old competitor to ReSharper is Visual Assist (by Whole Tomato Software, details here). Unlike ReSharper, Visual Assist started life as a C++ package. Thus its support for C++ is significantly more mature than that in ReSharper.
Most of the tricks that ReSharper can perform, Visual Assist can perform as well. And, like ReSharper, Visual Assist can be fully customized and tuned so that it does what you want, and avoids the sorts of things that you consider annoyances. It provides enhanced syntax coloring including a deeper understanding and coding of various data types than Visual Studio itself provides. It enhances Intellisense, and it knows to change your errant “.” to “->” and vice versa. It provides a properly working rename capability that is a pleasure to use.
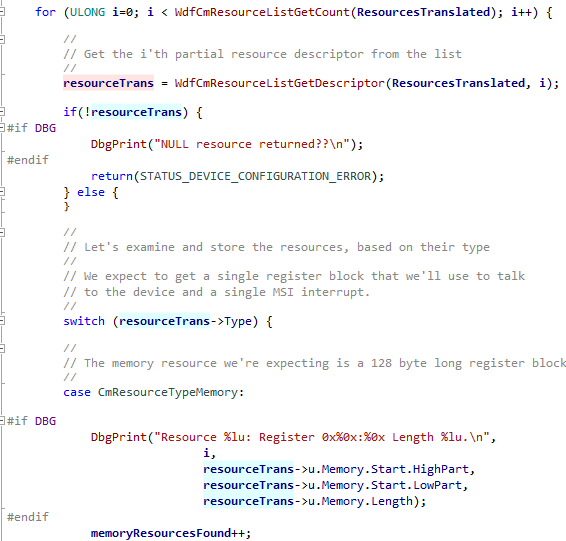
One small feature that Visual Assist has that I really love is how it highlights references to a given symbol. With Visual Assist, when you click on a symbol it will highlight all uses of that symbol within its scope. What makes it superb is that fact that it highlights uses of that symbol on the left side of an equals sign in pink, and uses of the symbol on the right side of an equals sign in blue (see Figure 4). This really speeds up my understanding when I’m working through code.

Another thing I love about Visual Assist is that it spell checks my comments as I type them. This makes me look smart. I need the help.
ReSharper C++ and Visual Assist each have their own unique features, and there is absolutely no way I can properly describe the features of either of these very powerful packages in this short article. Heck, you’ll barely be able to get a handle on the extent of their features by spending time on the vendor’s web sites! There are many little, subtle, features in each package that combine to really smooth some of Visual Studio’s rough edges. Fortunately, both packages are available for free trial, so you simply have to download each and try them yourself.
If you do download the trial version of these Extensions, you’ll want to enable only one of them at a time. Each can be individually disabled. And you’ll want to spend the time to do at least some basic customization and tuning of the package. Don’t waste your time downloading one of these packages, using it in its default mode, and making your decision based on that. Spend a little time customizing, and learning about its available features. Trust me on this. It’ll be time well spent. And when you make your decision, you’ll be happy with the outcome.
Because I’ve been a Microsoft MVP practically forever, over the past several years the makers of ReSharper and Visual Assist have been nice enough to provide me with free copies of their tools. As a result, I’ve had the pleasure of using both tools extensively over the course of several years. Because of its long-term availability, its stability in C++, its spell checking feature, and that cute little pink and blue highlighting trick I mentioned, I currently use Visual Assist X for my driver development projects. But I use ReSharper for the C# applications that I write. And I have both products installed, and I do periodically try the latest and greatest features of each.
In Summary
So where does that leave us? If you didn’t know this before, you now know that if there are things about Visual Studio that annoy you, or seem to work less than optimally, there are numerous customizations available that may be able to help. I’ve found that it’s totally worth spending a couple of hours playing with some of the major VS settings to “improve” my every day experience of editing.
In addition, you don’t have to be satisfied with the tricks that Visual Studio knows out of the box. There are several Extensions that make good sense for driver developers. One must-have Extension is Productivity Power Tools. It’s free and it’s undeniably helpful. The “big names” in VS Extensions, namely Resharper C++ and Visual Assist also work well in the world of drivers. They are both ridiculously rich in terms of features, and your choice will likely come down to personal preference. You’ll need to download and spend time customizing and using each one before you’ll know if it’s something you’ll want to add to your everyday work environment.
But, regardless of which Extensions you use, keep in mind that you owe it to yourself to spend the time needed to get your development environment setup to your liking. Once you do, every day you spend coding will have fewer little annoyances. And that’s got to be a win.
