How many times have you been working on a device or a driver project, seen some behavior in one of the existing Windows device stacks, and asked yourself “I wonder what’s going on with that particular sequence of I/O requests” or “What Control Codes, exactly, does that driver handle”?
Given that we don’t have the source code to most of the drivers that ship with Windows, getting these answers might seem daunting. But, fortunately, in Windows we have Filter Drivers.
In this article, we’re going to provide a brief overview of device Class Filters and present a tutorial walk-through of an example of a generic device Class Filter. As a part of this tutorial, we’ll describe the primary differences between WDF function drivers and WDF filter drivers, and how you receive, examine, and send Requests to the next device in the device stack.
The source code for the example driver we’ll be discussing is available on GitHub.
Let’s start with some general background on Windows filter drivers.
Different Types of Filter Drivers
As you probably already know, a Filter Driver is a uniquely powerful Windows component that allows you to insert a “Filter Device Object” above or below a given Device Object in a Windows device stack. This allows you to provide a driver that observes, manages, or even modifies I/O operations as they are processed. If you’re having trouble remembering your Windows device stack concepts (PDOs, FDOs, and the like) see the sidebar entitled Quick Review: PDOs and FDOs. It’s a quick read, and the review will probably do you good.
Sidebar:
Quick Review – PDOs and FDOs
Let’s start at the beginning, with PDOs and FDOs, because this is actually where most of the trouble starts.
As a rule, every device in Windows is discovered through the Plug-and-Play (PnP) process. The only exceptions to this rule are (a) software-only drivers that we refer to as “kernel services”, and (b) super-ancient hardware drivers that use the original Windows NT model. “Kernel services” are sometimes also referred to as “legacy style software drivers” or “NT V4 style software drivers.” The drivers in these exception categories create their Device Objects within their DriverEntry entry point. Lots of folks (including us) write kernel services to do things like monitor process creation, watch for registry changes, or provide other sorts of services from kernel mode. For the purposes of this article, we’re going to ignore all drivers that aren’t started by PnP.
So… as we said… as a rule, every device in Windows is discovered through the PnP process. This is true regardless of whether the device lives on a dynamically enumerable bus (such as PCIe or USB) or on a bus where the attached devices can’t be discovered at run time (such as I2C or SPI). When a bus driver enumerates a device on its bus, it creates a Device Object that represents the physical instance of the discovered device on its bus. In WDF, the bus driver creates this Device Object using the function WdfDeviceCreate. This Device Object, created by the bus driver, is referred to as a Physical Device Object, or PDO for short.
As part of the overall PnP process, the PnP Manager queries the bus driver for a list of its “child devices.” If the bus driver has discovered any devices on its bus, it replies with a list of pointers to the PDOs that is has previously created to represent those devices.
For each PDO returned from a bus driver (with some limited, special-case, exceptions), Windows attempts to find and start a driver that will be responsible for the functional aspects of the device. This is the function driver. It’s at this point that WDF function drivers are called at their EvtDriverDeviceAdd Event Processing Callback. Within this Callback, a WDF function driver creates the Device Object (using WdfDeviceCreate) that represents the functional aspect of the device. This Device Object, created by the function driver, is referred to as the Functional Device Object or FDO for short.

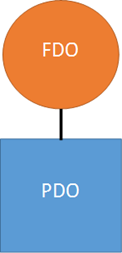
After the FDO has been created, it is attached to the underlying PDO that was previously created by the bus driver. The result is a pair of Device Objects that together represent (a) the physical presence of a device on a given bus (PDO), and (b) the functional aspect of that device (the FDO). This pair forms the basis of the Device Stack and is shown in Figure A. For the sake of simplicity, we’re ignoring filter drivers and their Device Objects in this discussion.
It’s important to note that, regardless of how a device is accessed, any I/O operations that are sent to a device will always enter at the top of the Device Stack in which the device appears. In other words, I/O requests will always go to the FDO first. This makes sense, because it’s the function driver (the one that created the FDO) that is responsible for the functional aspects of the device. And it’s most typically only the function driver (and not the bus driver) that knows how to process I/O requests for the device. In fact, the bus driver is rarely involved in processing typical I/O operations.
There are several different types of Filter Drivers, ranging from File System Filters to Filters for specific PnP device instances. In this article, we’re going to restrict our discussion to PnP device Class Filters. These are among the most common types of filter drivers written for Windows. They apply to entire installation class (i.e. category) of device(s). For example, a Class Filter could be used to filter all the CD-ROM devices in the system. Or all the Disk devices.
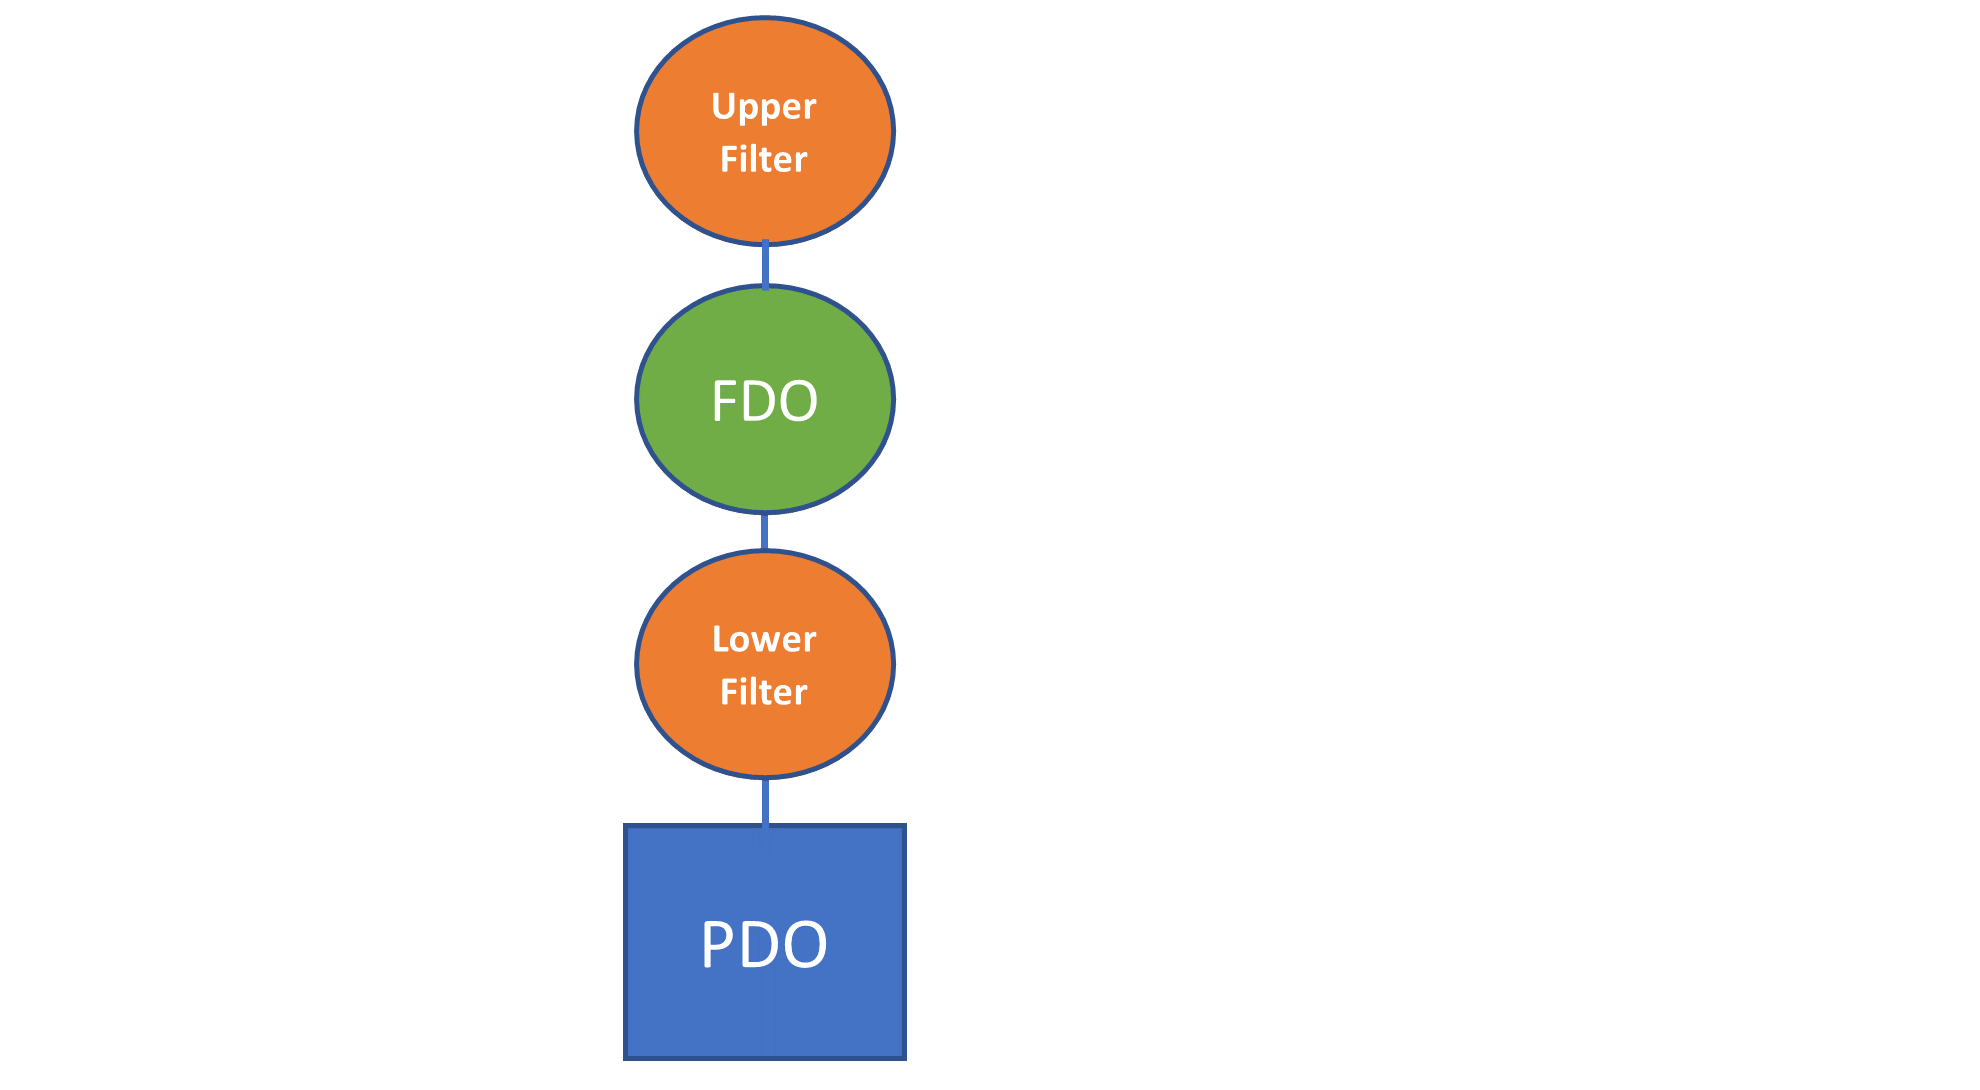
A Class Filter can be either be an upper filter or lower filter. Upper filters are instantiated above the FDO in the device stack, and therefore they see any I/O operations that are sent to a device before the function driver for that devices sees them. Lower filters are inserted below the FDO in the stack, and only get to handle I/O operations that are sent by the function driver “down” the stack towards the PDO. You can see what I’m talking about in Figure 1.

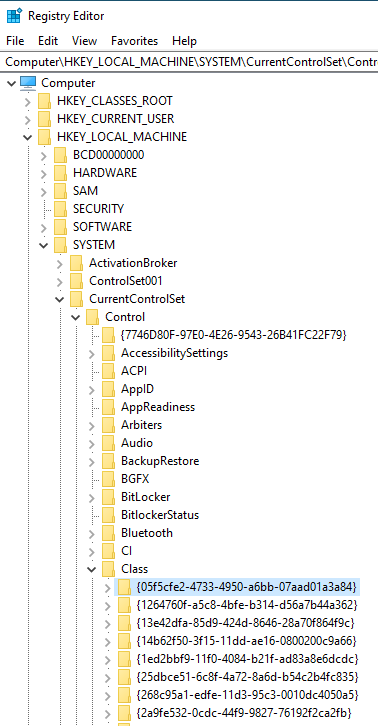
Class Filters are installed the way any driver is, using an INF file that copies the driver onto a local disk (typically to the %windir%\system32\drivers directory) and makes a series of entries in the Registry. The Device Install Class to be filtered is identified by a Device Class GUID. You can find a list of interesting and useful Device Class GUIDs online. Each Device Install Class that’s known to Windows (regardless of whether any such devices are currently attached to the system) appears in the Registry under HKLM\System\CCS\Control\Class, as shown in Figure 2. To indicate that you have a driver that wants to filter a given class of device, all you need to do (aside from installing your driver in the usual way) is make an “UpperFilters” or “LowerFilters” entry in the Registry under the Device Install Class that you want to filter. This will cause the PnP Manager to instantiate your filter either above (for an upper filter) or below (for a lower filter) the function driver’s FDO for that class. But… WAIT! We’re getting a bit ahead of ourselves. We’ll look at the INF file to install our filter later in this article.

WDF Filters: A Brief Overview
Two of the primary advantages that WDF provides over older Windows driver models are the overall simplicity/organization of the model and the fact WDF does much of the common (and sometimes complex) grunt work that writing a driver on Windows requires. This includes, you will recall, providing an integrated state machine for PnP and Power Management handling. These advantages are perhaps even more apparent and welcome when writing a filter driver using WDF than when writing a function driver.
A WDF filter driver is structured identically to a function driver. In DriverEntry, the driver creates its WDFDRIVER Object and connects with the Framework. For a filter driver, the EvtDriverDeviceAdd Event Processing Callback is called when the PnP Manager is in the process of enumerating a device that the driver has been specified to filter.
Within EvtDriverDeviceAdd, the filter driver informs the Framework that it is a filter (as opposed to a function driver) by calling the function WdfFdoInitSetFilter. Calling WdfFdoInitSetFilter causes the Framework to change many of its default function driver specific behaviors to filter driver specific behaviors. These changes include:
- When a filter driver creates its WDFDEVICE Object, the Framework will copy the I/O Type (such as Buffered I/O or Direct I/O) and Device Type from the Device Object that’s being filtered to the filter driver’s newly created WDFDEVICE Object.
- The Framework will (by default) set a filter driver to NOT be the Power Policy Owner for the stack.
- WDFQUEUEs that are created by a filter driver will default to being non-power managed.
- The Framework will (again, by default) automatically send any Create, Cleanup, and Close Requests received by a filter driver to the underlying device stack.
- The Framework will automatically send down the device stack any Request types that a filter driver does not specifically handle.
These default behaviors make writing WDF filter drivers particularly easy and pleasant. But perhaps the most notable behavior change is the last one listed above: The Framework automatically sends any I/O Requests that your filter driver does not handle down the stack. What this means for you, as a driver dev writing a filter driver, is that you only need to write code to handle Request types that your filter is interested in. If you only care about Read Requests, then you only need to write code that handles reads. If any other type of Request is sent to your filter driver, such as a Write or a Device Control, the Framework will automatically send that Request down the device stack to your Local (In-Stack) I/O Target. This relieves you from having to write lots of useless plumbing and allows you to focus on the work that you want to do.
In addition to specifying your device as a filter device in EvtDriverDeviceAdd, you will also need to create your WDFDEVICE Object in the usual way. And before leaving EvtDriverDeviceAdd you will also create any WDFQUEUEs you want to use for receiving Requests, bearing in mind that you only need to provide Queues and EvIo Event Processing Callbacks for those Requests that your driver wants to handle.
The only other Event Processing Callbacks that a WDF filter driver typically implements are the Callbacks related to Request processing. These are typically the EvtIo Event Processing Callback that process Requests types of interest that are presented from the Queue(s) that you created.
Let’s now turn our attention to looking at the code for our generic filter driver sample. Note that, in the interest of saving space, we’ve removed many of the comments and DbgPrint statements from the code shown in this article. So, if you want to play with this code, we urge you to get the version from GitHub (and not just cut/paste the code from this article).
GenFilter: The Generic WDF Filter Driver
We wrote the Generic WDF Filter Driver to demonstrate the wonderful simplicity and usefulness of WDF filter drivers. It is a fully working example of a WDF class filter that you can build and use immediately, perhaps with a few customizations, to monitor or observe the I/O operations that are processed in a given device stack. By default, the INF file for this filter is set to filter CDROM Class devices. To filter another class of device, all you need to do is change the Class Name and GUID in the INF file. We’ll talk more about the INF file later in this article.
GenFilter: DriverEntry
Like most WDF drivers, GenFilter doesn’t do much in its DriverEntry routine. Its activities are restricted to instantiating a WDFDRIVER Object and thus getting connected with the Framework. You can see the code in Figure 3.
extern "C"
NTSTATUS
DriverEntry(PDRIVER_OBJECT  DriverObject,
            PUNICODE_STRING RegistryPath)
{
    WDF_DRIVER_CONFIG config;
    NTSTATUS          status;

#if DBG
    DbgPrint("GenFilter...Compiled %s %s\n",
             __DATE__,
             __TIME__);
#endif

    //
    // Initialize our driver config structure, specifying our
    // EvtDeviceAdd event processing callback.
    //
    WDF_DRIVER_CONFIG_INIT(&config,
                           GenFilterEvtDeviceAdd);

    //
    // Create our WDFDEVICE Object and hook-up with the Framework
    //
    status = WdfDriverCreate(DriverObject,
                             RegistryPath,
                             WDF_NO_OBJECT_ATTRIBUTES,
                             &config,
                             WDF_NO_HANDLE);

    if (!NT_SUCCESS(status)) {
        goto done;
    }

    status = STATUS_SUCCESS;

done:

    return status;
}
Figure 3 – DriverEntry
There’s really not much to say about the code in DriverEntry. You can see the GenFilter doesn’t specify any WDF_OBJECT_ATTRIBUTES, because it can’t change the default parent of the WDFDRIVER Object that it’s creating, it doesn’t need to provide Cleanup or Destroy Event Processing Callbacks, and it doesn’t need to specify a context for our WDFDRIVER Object. As you can see, GenFilter uses DbgPrint messages to display its output in the debugger. If the filter driver were using WPP Tracing, it would need to call WPP_INIT_TRACING here in DriverEntry and also provide a Destroy callback for our WDFDRIVER Object in which it called WPP_CLEANUP.
GenFilter: EvtDriverDeviceAdd
Again, the processing in this callback is about as simple as it could possibly be. GenFilter starts by calling WdfFdoInitSetFilter, to inform the Framework that it wants to instantiate a WDFDEVICE Object for a filter device and not a functional device. Don’t let the name of this function confuse you. Even though it’s called WdfFdoInit it takes as input a pointer to the WDFDEVICE_INIT structure that’s passed in the DeviceInit parameter of your EvtDriverDeviceAdd Callback. By using the name FdoInit instead of DeviceInit the Framework is trying to emphasize that this operation is only valid for filter and/or function device objects (that is, this function is not valid for PDOs). If you think that this is an annoying and potentially confusing quirk of Framework naming, I won’t disagree with you. But nobody asked our opinion, so let’s move on.
Next, GenFilter specifies a context area (GENFILTER_DEVICE_CONTEXT) for the Framework to associate with the WDFDEVICE instance. And then the driver calls WdfDeviceCreate to instantiate the WDFDEVICE Object.
Finally, before leaving EvtDriverDeviceAdd, the driver specifies EvtIo Event Processing Callbacks for the Request types that it’s interested in handling, and creates a single, default, WDFQUEUE. In the GenFilter example, we specified EvtIo callbacks for Read, Write, and Device Control operations – just to show how it would be done. However, remember what we said earlier: You only need to specify EvtIo callbacks for those Request types that your filter wants to examine. Any Request types that you don’t provide an EvtIo Event Processing Callback for will be automatically sent by the Framework to the next Device Object in the device stack. You can see the code for GenFilter’s EvtDriverDeviceAdd in Figure 4.
NTSTATUS
GenFilterEvtDeviceAdd(WDFDRIVER       Driver,
                      PWDFDEVICE_INIT DeviceInit)
{
    NTSTATUS                  status;
    WDF_OBJECT_ATTRIBUTES     wdfObjectAttr;
    WDFDEVICE                 wdfDevice;
    PGENFILTER_DEVICE_CONTEXT devContext;

    //
    // Indicate that we're creating a FILTER Device, as opposed to a FUNCTION Device.
    //
    WdfFdoInitSetFilter(DeviceInit);

    WDF_OBJECT_ATTRIBUTES_INIT_CONTEXT_TYPE(&wdfObjectAttr,GENFILTER_DEVICE_CONTEXT);

    status = WdfDeviceCreate(&DeviceInit,&wdfObjectAttr,&wdfDevice);

    if (!NT_SUCCESS(status)) {
        goto done;
    }

    devContext = GenFilterGetDeviceContext(wdfDevice);
    devContext->WdfDevice = wdfDevice;

    //
    // Create our default Queue -- This is how we receive Requests.
    //
    WDF_IO_QUEUE_CONFIG_INIT_DEFAULT_QUEUE(&ioQueueConfig,WdfIoQueueDispatchParallel);

    //
    // Specify callbacks for those Requests that we want this driver to "see."
    //
    ioQueueConfig.EvtIoRead          = GenFilterEvtRead;
    ioQueueConfig.EvtIoWrite         = GenFilterEvtWrite;
    ioQueueConfig.EvtIoDeviceControl = GenFilterEvtDeviceControl;

    status = WdfIoQueueCreate(devContext->WdfDevice,&ioQueueConfig,WDF_NO_OBJECT_ATTRIBUTES,WDF_NO_HANDLE);

    if (!NT_SUCCESS(status)) {
        goto done;
    }

    status = STATUS_SUCCESS;

done:

    return status;
}
Figure 4 – GenFilter EvtDriverDeviceAdd
GenFilter: EvtIoDeviceControl
Next, let’s have a look at how GenFilter handles device control (that is, IOCTL) Requests that it receives.
To demonstrate how we might search for a given operation, the GenFilter example examines each device control Request that it receives. If the Control Code of the received device control is IOCTL_YOU_ARE_INTERESTED_IN (an IOCTl that we made up and defined in the driver’s header file for this example) then the driver:
- Prints a message in the debugger
- Calls the function GenFilterSendWithCallback. This function sets an EvtWdfRequestCompletionRoutine Event Processing Callback that will be invoked when the Request is complete, and sends the Request to the underlying device stack, using WdfRequestSend, specifying asynchronous processing.
- When the EvtWdfRequestCompletionRoutine Event Processing Callback runs, prints out the status of the Request and completes it.
Of course, in a real filter driver, you could do anything you wanted with the Request(s) that you’re interested in. This includes examining, or even changing, the data associated with the Request (before or after the Request has been processed) or sending the Request a different, or even an additional, I/O Target. It’s up to you.
For those device control Requests that GenFilter receives that have a control code that we are not interested in (that is, in our example, the control code is not IOCTL_YOU_ARE_INTERESTED_IN) the driver calls GenFilterSendAndForget to send the Request to the underlying device stack and do no further processing on the Request.
You can see the code for EvtIoDeviceControl Event Processing Callback in Figure 5, and the code for GenFilterSendWithCallback and EvtWdfRequestCompletionRoutine in Figure 6. We’ll show you the code for GenFilterSendAndForget in the next section.
VOID
GenFilterEvtDeviceControl(WDFQUEUE   Queue,
                          WDFREQUEST Request,
                          size_t     OutputBufferLength,
                          size_t     InputBufferLength,
                          ULONG      IoControlCode)
{
    PGENFILTER_DEVICE_CONTEXT devContext;

    devContext = GenFilterGetDeviceContext(WdfIoQueueGetDevice(Queue));

    UNREFERENCED_PARAMETER(OutputBufferLength);
    UNREFERENCED_PARAMETER(InputBufferLength);

    //
    // We're searching for one specific IOCTL function code that we're interested in
    //
    if (IoControlCode == IOCTL_YOU_ARE_INTERESTED_IN) {

#if DBG
        DbgPrint("GenFilterEvtDeviceControl -
- The IOCTL we're looking for was found!  Request 0x%p\n",
                 Request);
#endif
        //
        // Do something useful.
        //

        //
        // We want to see the results for this particular Request... so send it
        // and request a callback for when the Request has been completed.
        GenFilterSendWithCallback(Request,devContext);

        return;
    }

    GenFilterSendAndForget(Request,
                           devContext);
}
Figure 5 – EvtIoDeviceControl
—
VOID
GenFilterSendWithCallback(WDFREQUEST Request,PGENFILTER_DEVICE_CONTEXT DevContext)
{
    NTSTATUS status;

    WdfRequestFormatRequestUsingCurrentType(Request);

    WdfRequestSetCompletionRoutine(Request,GenFilterCompletionCallback,WDF_NO_SEND_OPTIONS)) {

    //
    // Set the completion routine...
    //
    WdfRequestSetCompletionRoutine(Request,
                                   GenFilterCompletionCallback,
                                   DevContext);
    //
    // And send it!
    //
    if (!WdfRequestSend(Request,
                        WdfDeviceGetIoTarget(DevContext->WdfDevice),
                        WDF_NO_SEND_OPTIONS)) {

        //
        // Oops! Something bad happened, complete the request
        //
        status = WdfRequestGetStatus(Request);

        DbgPrint("WdfRequestSend failed = 0x%x\n",
                 status);
        WdfRequestComplete(Request,
                           status);
    }

    //
    // When we return the Request is always "gone"
    //
}


VOID
GenFilterCompletionCallback(WDFREQUEST                     Request,
                            WDFIOTARGET                    Target,
                            PWDF_REQUEST_COMPLETION_PARAMS Params,
                            WDFCONTEXT                     Context)
{
    NTSTATUS status;
    auto*    devContext = (PGENFILTER_DEVICE_CONTEXT)Context;

    UNREFERENCED_PARAMETER(Target);
    UNREFERENCED_PARAMETER(devContext);

    DbgPrint("GenFilterCompletionCallback: Request=%p, Status=0x%x; Information=0x%Ix\n",
             Request,
             Params->IoStatus.Status,
             Params->IoStatus.Information);

    status = Params->IoStatus.Status;

    //
    // Potentially do something interesting here
    //
    WdfRequestComplete(Request,status);
}
Figure 6 – Send with Completion Callback
Perhaps the most interesting (and important) thing to note in Figure 6 is in the GenFilterSendWithCallback function. Note that in this function, GenFilter checks the return value from WdfRequestSend and if it is FALSE, it calls WdfCompleteRequest for the Request. WdfRequestSend returns FALSE when it is unable to deliver the provided Request to the indicated I/O Target. So, WdfRequestSend returning false means that the send operation itself failed, the Request never reached the target device/driver, and the completion routine will not be called. As a result, when FALSE is returned, the driver that called WdfRequestSend still “owns” the Request (and is therefore responsible for completing it).
Because GenFilter provides an EvtWdfRequestCompletionRoutine Callback, when WdfRequestSend succeeds, the filter driver will eventually be called back at its EvtWdfRequestCompletionRoutine Callback. There it re-gains ownership of the Request after the drivers in the underlying device stack have completed it. As mentioned earlier, in our example all we do is print a message in the debugger and complete the Request.
GenFilter: EvtIoRead and EvtIoWrite
We’ve included processing for EvtIoRead and EvtIoWrite just as examples of how to send a Request along with no further processing. Each of these routines simply prints out a message in the debugger and calls GenFilterSendAndForget.
The code for EvtIoRead is in Figure 7.
VOID
GenFilterEvtRead(WDFQUEUE Queue,WDFREQUEST Request,size_t Length)
{
    PGENFILTER_DEVICE_CONTEXT devContext;

    UNREFERENCED_PARAMETER(Length);

#if DBG
    DbgPrint("GenFilterEvtRead -- Request 0x%p\n",Request);
#endif

    GenFilterSendAndForget(Request,devContext);
}
Figure 7 – GenFilter’s EvtIoRead Event Processing Callback
And the code for GenFilterSendAndForget appears in Figure 8.
VOID
GenFilterSendAndForget(WDFREQUEST Request,PGENFILTER_DEVICE_CONTEXT DevContext)
{
    NTSTATUS status;

    WDF_REQUEST_SEND_OPTIONS sendOpts;

    WDF_REQUEST_SEND_OPTIONS_INIT(&sendOpts,WDF_REQUEST_SEND_OPTION_SEND_AND_FORGET);

    if (!WdfRequestSend(Request,WdfDeviceGetIoTarget(DevContext->WdfDevice),&sendOpts)) {

        status = WdfRequestGetStatus(Request);
#if DBG
        DbgPrint("WdfRequestSend 0x%p failed - 0x%x\n",Request,status);
#endif
        WdfRequestComplete(Request,status);
    }
}
Figure 8 – SendAndForget
Setting WDF_REQUEST_SEND_OPTION_SEND_AND_FORGET tells the Framework that when the driver sends this Request to the indicated I/O Target, the sending driver doesn’t want to see the Request again. There is no completion callback. When a driver sends a Request with _SEND_AND_FORGET it is the logical equivalent of that driver calling WdfRequestComplete for that driver. But, once again, note that the driver checks the return value from WdfRequestSend. As we saw previously, if the return value is FALSE, the send operation itself failed to deliver the Request to the indicated I/O Target. Therefore, the driver still owns the Request and is responsible for completing it.
Pretty Simple, Right?
So, that’s our generic filter sample driver. If you download the project from GitHub, you’ll see that there’s really no more to it than we’ve described above.
One Last Item: Installation
Back in the old days, it used to be the case that installing WDF Filters could be very tricky. This is because we needed to bring the co-installer along with the driver that we were installing. However, in recent versions of WDF (specifically, since Windows 8.1) we no longer need to provide the co-installer with WDF drivers. This is because (a) WDF drivers are “always” able to use a newer version of the Framework than that with which they were built, and (b) each OS version ships with (and receives updates to) the most up-to-date version of the Framework that will work on that version of the OS.
This makes installing WDF class filters extremely simple. In fact, you can create a trivial “right click” INF file to install your filter, as shown in Figure 9.
[Version]
Signature   = "$Windows NT$"
Class       = %ClassNameToFilter%   ; Be sure the class NAME and ...
ClassGUID   = %ClassGUIDToFilter%   ; ... the class GUID agree.
Provider    = %Provider%
DriverVer   =
CatalogFile = GenFilter.cat

[DefaultInstall.NT]
CopyFiles = @GenFilter.sys
Addreg    = GenFilter.AddReg

[DestinationDirs]
DefaultDestDir = 12

[GenFilter.AddReg]
HKLM, System\CurrentControlSet\Control\Class\%ClassGUIDToFilter%, UpperFilters, 0x00010008, %DriverName%

[DefaultInstall.NT.Services]
AddService = GenFilter, , GenFilter.Service.Install

[GenFilter.Service.Install]
DisplayName      = %ServiceName%
Description      = %ServiceDescription%
ServiceBinary    = %12%\%DriverName%.sys        ;%windir%\system32\drivers\
ServiceType      = 1                            ;SERVICE_KERNEL_DRIVER
StartType        = 0                            ;SERVICE_BOOT_START
ErrorControl     = 1                            ;SERVICE_ERROR_NORMAL

[SourceDisksFiles]
GenFilter.sys=1

[Strings]
ClassGUIDToFilter       = "{4d36e965-e325-11ce-bfc1-08002be10318}"
ClassNameToFilter       = "CDROM" ; MUST AGREE WITH ABOVE
Provider                = "OSR Open Systems Resources, Inc."
ServiceDescription      = "Generic Upper Filter"
ServiceName             = "GenFilter"
DriverName              = "GenFilter"
DiskId1                 = "Genric Upper Filter Installation Disk"
Figure 9 – “Right Click” INF file for Generic Filter
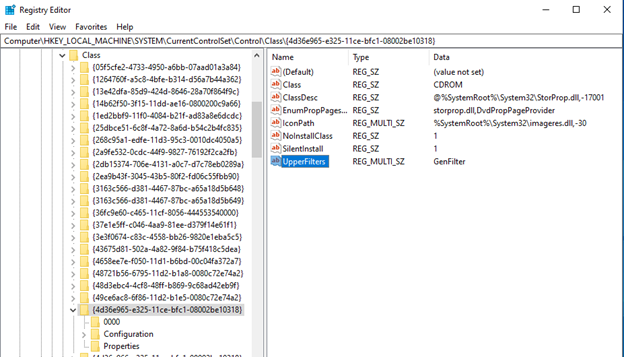
In Figure 9, you can see that we’ve setup our INF file so that our Generic Filter will be installed as an upper filter of all CDROM class devices. These are both definitively indicated in the GenFilter.AddReg section, where we make the necessary Registry entry under the Class GUID for the CDROM devices. You can see the resulting entry in Figure 10.


